Showing posts with label Christmas. Show all posts

December 26, 2012

Enjoying the Christmas Glow {Just a Little Bit Longer}


Hoping that you and yours had a wonderful Christmas! The blog posts will be light over the next week as I continue to enjoy the season with family, friends and a new foster puppy!

I have a few vintage New Year's cards I hope to share with you in the days ahead... stay tuned!


sig trans Pin It!

December 19, 2012

Merry, Merry Kitchen Tree {Vintage Style}

I have set up a small Christmas tree in my kitchen dining room for the last few years. Rather than save the Christmas decor for only the more formal rooms in the house, I can enjoy the holiday lights while I am whipping up a batch of holiday cookies or a quick meal.


I have a larger tree in the family room, but that is not visible while I'm unloading the dishwasher or doing other glamorous chores that must be done every day. It's a small way of keeping the holiday spirit in view during the busiest days of the year.


This tree is just about ten years old, but it has a vintage vibe to it, especially after I've added some tiny vintage Christmas ornaments, glass bead garland and a sweet little frosted tree topper. Under the tree I've created yet another little glitter {Putz} house village. I've kept the color scheme red, white and pink this year. That way, when the tree is still up in mid-January, I can say it's a Valentine-themed tree and I am actually way ahead in decorating for the next holiday {lol}.


Seriously, this little tree village is the last decoration to come down in my house. Particularly when the cold dark days of winter settle in and most of the decorations have been packed away, this little tree brings a little light to the kitchen. The season passes so quickly. Shouldn't the holiday sparkle continue just a little bit longer?

sig trans Pin It!

December 18, 2012

Vintage Deer & Bottle Brush Trees {A Tiny Vignette}

In my haste to get the last of the holiday decorations up, I decided to clear a spot on the bookcase for these little vintage deer. A set of three purchased at the flea market, they really can be used throughout the year and do reside in my office permanently. With a few bottle brush trees that were too large to join the other Christmas vignettes throughout my house, they make a nice little accent to the room.


I am busy wrapping, baking, cooking and most of all, waiting to bring my family together for Christmas!

sig trans Pin It!

December 15, 2012

White Paper Packages {Bows of a Different Color}


I snapped this picture with my phone from a Better Homes & Gardens magazine from a doctor's office last week. I love the simplicity of the white paper and base gold ribbon. Each package is finished with a bow of a different color. This would be a great way to wrap gifts for each family member without having to label them. Orange for one child, pink for another... get it?

Too bad I have wrap left over from last year and just purchased a big roll the week before. This idea will definitely go into the style files for next year!

I'll be posting my vintage Christmas glitter (Putz) house display on Monday. I'm  just finishing up processing the photos. Have a great weekend!

sig trans
Pin It!

December 13, 2012

Getting the {Vintage Christmas Glitter} Houses Ready


It's Christmas crunch-time, right? I have been late in finishing up my holiday decor, but the house seemed a bit unfinished without setting up some of my vintage Christmas glitter (or Putz) houses.

So, here I am... getting out the boxes, and falling in love with these tiny bits of cardboard and glitter that will become a little holiday village.

Check back, the completed project will come soon!


sig trans Pin It!

December 10, 2012

Vintage Inspired Book House Village


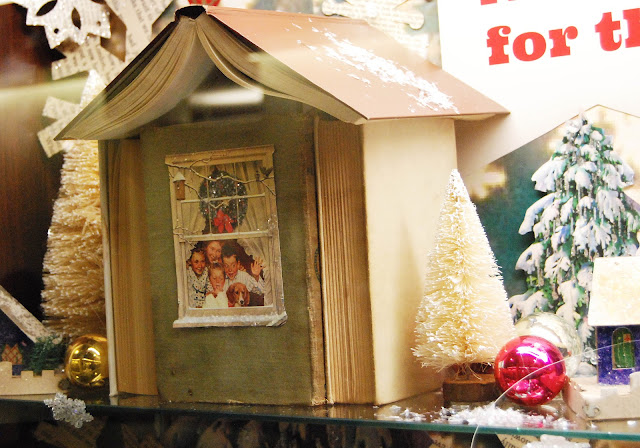
This was a fun project I did at work one day and I know those who love vintage finds will enjoy seeing the finished product. Challenged with creating a holiday-themed display case that would seem right at home at a library, I began my search on Pinterest for inspiration. I was initially going to use my collection of miniature glitter houses and refer to holiday decor books, but then I found a bird house made out of books and the creative light bulb went on!


Each house was made of four old books two for the sides, one for the door and another for the roof. I picked older books from my stash with yellowed pages and fabric covers. I like the aged look of the textures, perfect my favorite theme of evoking fond memories with vintage finds. I propped up the "roofs" with a thin wooden dowel to keep them raised so that there would be a nice peak to their shape.


I finished the houses with pictures from vintage Christmas cards, either copied from the web or from my own collection. Trimmed and then sprinkled with paste and glitter, they are affixed to the book with  blue painter's tape.


I did manage to add a few of my vintage glitter houses, deer and ornaments and a few bottle brush trees to add just a little more sparkle to the case. Lastly was an addition of beaded garland and sprinkling of snowflakes. I firmly believe you can never have enough glitter!


The beautiful evergreen trees are actually scans of a vintage Dennison bulletin board decoration that I enlarged, printed and added silver glitter to.  The snowflakes are scans of vintage book pages printed on card stock and laminated, then embellished with glitter. The bells are a scan of another vintage card, enlarged.

I really enjoy using old books in crafts and display design. I have a Pinterest board with over 100 pins dedicated to them that you can see HERE. It was a fun display to create, although I had glitter on my shoes for the rest of the day!
sig trans Pin It!

December 9, 2012

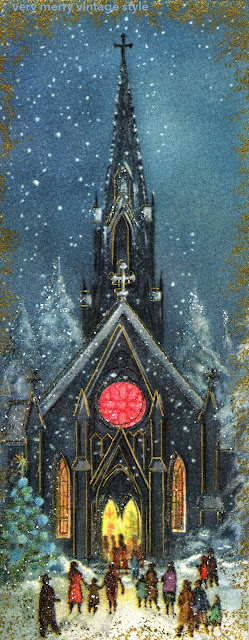
Vintage Christmas Card: Church Aglow

This vintage Christmas card is sprinkled with glitter and touches of metallic gold. I wish those features came through better for you online. It's a gorgeous card and that bright pink window is just so pretty.


I've recently been including the inside message to the blog posts about cards from my collection. The phrases are beautiful and perhaps you can use them in your holiday projects. I hope to go back into my previous posts where I've shared cards with you and add the messages as well.

I've posted the sender's signature for fun... you never know who may come across a relative's card some day. Be forewarned, I'm not parting with any of my cards, even if they were written by your dear grandmother. Each one was collected with care and I've become rather fond of them; just like your grandmother was when she picked them to send!

Inside message:
At this Christmas Season and throughout the New Year,
may you be be blessed with Every happiness.

Signed:
Rose Marie Bard and boys

Marked:
201-18
sig trans Pin It!

December 6, 2012

How to Make a Christmas Tree with Books


I had a fun day at work today. I got to make a Christmas tree out of books! The job is not so bad, right?  I am more than slightly obsessed with Pinterest, which is where I got the idea. I work at a library, and it seemed like an idea that could be executed pretty inexpensively. And besides, what is more perfect than a tree out of books for the library's holiday decor?

I tried to find a tutorial to guide me but didn't have much luck. In case you'd like to make your own Christmas tree out of books, here's some tips I'll pass along.

You'll need:

  • Books (of course). I used about 80.
  • 2 packs of Wood shims if your tree is going to be very tall
  • 3 strings of large bulb LED lights
  • Tree topper (either purchased or improvised as below)
Gather your own books or find a used book store at a library. The library where I work has many books for as little as 25 cents. The titles don't really matter, you're looking for different sizes and widths. I also removed the book jackets from every book I used. I like the mix of solid colors on the covers, and the book jackets would be too busy. I also turned the books so that the pages faces out. I like the neutral  look and then you're not distracted by the titles. The large tree above used about 80 books, but you can use any amount you have.

Begin by laying out the books in a flat circle. I started with a 48" round area and placed the books like the spokes of a wheel. Don't forget to put some books in the middle, as this will be the supporting base. Don't worry if they are not perfectly level. The weight of the books keeps it rather sturdy. I also used wood shims from the hardware store (about 2 packages) to help keep the layers somewhat level.

Keep stacking and turning the books so that you get nice layered, mixed depth edges. Start each layer in the middle. I did put the heavier and larger books at the bottom, however you will need some thinner and smaller books to help even out your layers and provide support on the edges. The closer you can keep the books to each other in your layers, the sturdier the book tree will be.

You'll get to the point where three books will be all you can fit on a layer.  Line two up vertically and place another across the bottom horizontally to make a rectangle as best you can. You can use this method for many, many layers by just turning the edges of your three books to a rectangle shape a bit each time. Then you'll get down to two books, and make a square with them. Keep layering sets of two books and turning each "square" slightly for texture and interest... and balance!

I then used single books and made many layers, again turning the books so that various "points" of the books were showing. Before adding the lights, give your tree the once over and add wood shims wherever you see gaps in the book layers. These really helped my tree become a bit more sturdy.


I added the large C9 lights last, winding them rather rightly around the books all the way to the top. I used 3 stands. They're pretty cool as they are filled with tinsel. They are also LED lights and don't heat up. Not a bad idea when they're wrapped around old books in a building filled with books.

My tree topper on the top tree was that very inexpensive and cute retro star I saw in the store and blogged about the other day. I simply glued the removable base to the top book with Gorilla Glue, let it dry for 24 hours, and pushed the star into the base. It's not so pretty from this angle, but you don't see that part as the tree is up on a counter and you're looking up at it from below. I just included this next shot so you could see my glue work! Also, see how the books are turned a bit and I layered various the various colors.


I made a second tree for the Friends' bookstore and improvised with smaller lights and a small book on it's side for the topper. This one went up really fast and would be very easy to do at home. I didn't use any adhesive to hold the books together, which is nice because after the holidays, the books can go right back on your shelf undamaged.


We have a used book store operated by the Friends of the Library, an amazing group of volunteers that generously donate their time and funds raised to the library. They receive boxes and boxes of books as donations which they then sell in their shop. The group supplied me with all the books for these projects.


Have fun making your book tree... Season's Readings to You and Yours!


sig trans
Linking to:
Common Ground
My Romantic Home
http://tatertotsandjello.com Pin It!

Vintage Christmas Card {Pinecones in the Snow}

The colors on some of my vintage Christmas cards are still true after 50-60 years of life. How is that? The paper is so fine... smooth and of nice quality; perhaps it is because of this they hold their color so.


Simple cards like this grab my eye. The possibility of adding a bit of sparkle when I craft with them {copies of course!} catches my eye among the hundreds I must sift through at markets and sales each year.

Inside Message: 

Season's Greetings and Best Wishes for your happiness now and through the coming year 

Signed: Most Sincerely, Vernell and family

Marked: Hampshire, made in USA 302910

sig trans Pin It!

December 5, 2012

{Pretty} Pink Fireplace Vintage Christmas Card

Oh, this card is it... the perfect blend of holiday magic, precious pink and feminine style! What a treasure this was to find at the flea market.

I'm going to use it to make some Christmas cards to hand out at the office... glitter it up a bit and let all my fellow {female} co-workers share it's beauty. I always use copies of the vintage cards, never the original to make my handcrafted cards.

This image is shared for your personal, non-commercial use only.
Inside message:

With holly in the hallway and the Christmas tree so bright,
May yours be the enchantment of a Christmas that's just right

Signed: Dorothy Schrader

Marked:
5x1080 Made in USA 4674

sig trans
Linking this post to:
My Romantic Home
Common Ground

Pin It!

December 4, 2012

Vintage Pinecone Elves {Sweet}


I started off the holiday decorating early, but I haven't kept the pace to finish up. My little vintage pinecone elf village is currently just a fraction of what I display. Two houses for six elves might seem appropriate (they are little guys after all), but usually I like to mix them among all my little glittery putz Christmas houses. I haven't brought any of those out yet.


The elves are currently living among two modern glitter houses from Bath & Body Works {sorry fellas}. Not that these houses aren't pretty, but the vintage elves would surely feel more at home among the vintage Christmas houses.


I hope to finish up this weekend with the Christmas decorations. Too bad these little elves can't do the decorating while I'm at work!

sig trans Pin It!

November 29, 2012

O {White} Christmas Tree, O {White} Christmas Tree

The {White} Tree is up! I am so pleased at how it turned out. The white branches reflect the lights and all the vintage ornaments in such a beautiful way.


Yes, those are vintage suitcases and a brown paper package under the tree at the moment! I was  fretting about getting {or making} a new tree skirt and as it turns out, the branches on this tree drape just about all the way to the ground. I really don't miss the little stick of a trunk that used to stick out on the old tree! The suitcases and the box hide the tree stand, and I didn't have a chance to put them away anyway. The little white suitcase holds some exercise bands and weights and the other case was on top of an armoire which now holds the nativity scene.


The tree is always the major task in holiday decorating for me, so I am glad it is done and I can enjoy it's beauty for the season. It's typically the first decoration that I put up each year, and the last I take down. For me, the tree is definitely the central part of the holiday decor.

sig trans
Linking to:
Common Ground Vintage Inspiration
My Romantic Home
Craftberry Bush
Whipperberry Pin It!

November 23, 2012

Putting Up the {White Flocked} Christmas Tree

I had always envied the white trees I had seen in magazines or online and now I am so excited to put up the one I purchased at the end of the season sale last year! I love the flocking... although it is very messy to put up. By the time I was done fluffing the branches, the floor had a light layer of "snow" and so did my clothes.

That's about as far as I got today after putting away the fall decorations and straightening up a bit. The ornament {vintage, of course!}boxes will come out tomorrow, and I have to remember where I packed the tree topper.


I saw a nice star at Walmart the other day that had a vintage look to it. I'll have to get the tree decked out and see if I want to change the top as well this year.


Slow but sure, the decorations will get up. I don't really see it as a chore; I do enjoy unwrapping the sparkling goodies I haven't seen for a year and the memories that go along with them. Let the season begin!

sig trans


Pin It!

November 15, 2012

Fun at the Flea {Vintage Ceramic Christmas Tree}


This sweet vintage ceramic Christmas tree caught my eye at the flea market last weekend (and of course ended up coming home with me). I went to the market on the last day of the event. The vendor said many people had looked at the tree and passed it by.


Maybe it was the dust mixed in with the glitter, the little berry tree topper (below) that had come unglued, or the broken light fixture... all totally fixable. It was a great deal and will be perfect on my desk at work or maybe here at home, where it awaits repairs.

The flea market is so enjoyable to me because I can spend so little money, enjoy the sights of all the vintage treasures, and bring some little bits home to admire. And if I tire of them, I know that by donating them to Goodwill, they'll find another person to love them (for a little while).


sig trans Pin It!
Related Posts with Thumbnails