I had a fun day at work today. I got to make a Christmas tree out of books! The job is not so bad, right? I am more than slightly obsessed with
Pinterest, which is where I got the idea. I work at a library, and it seemed like an idea that could be executed pretty inexpensively. And besides, what is more perfect than a tree out of books for the library's holiday decor?
I tried to find a tutorial to guide me but didn't have much luck. In case you'd like to make your own Christmas tree out of books, here's some tips I'll pass along.
You'll need:
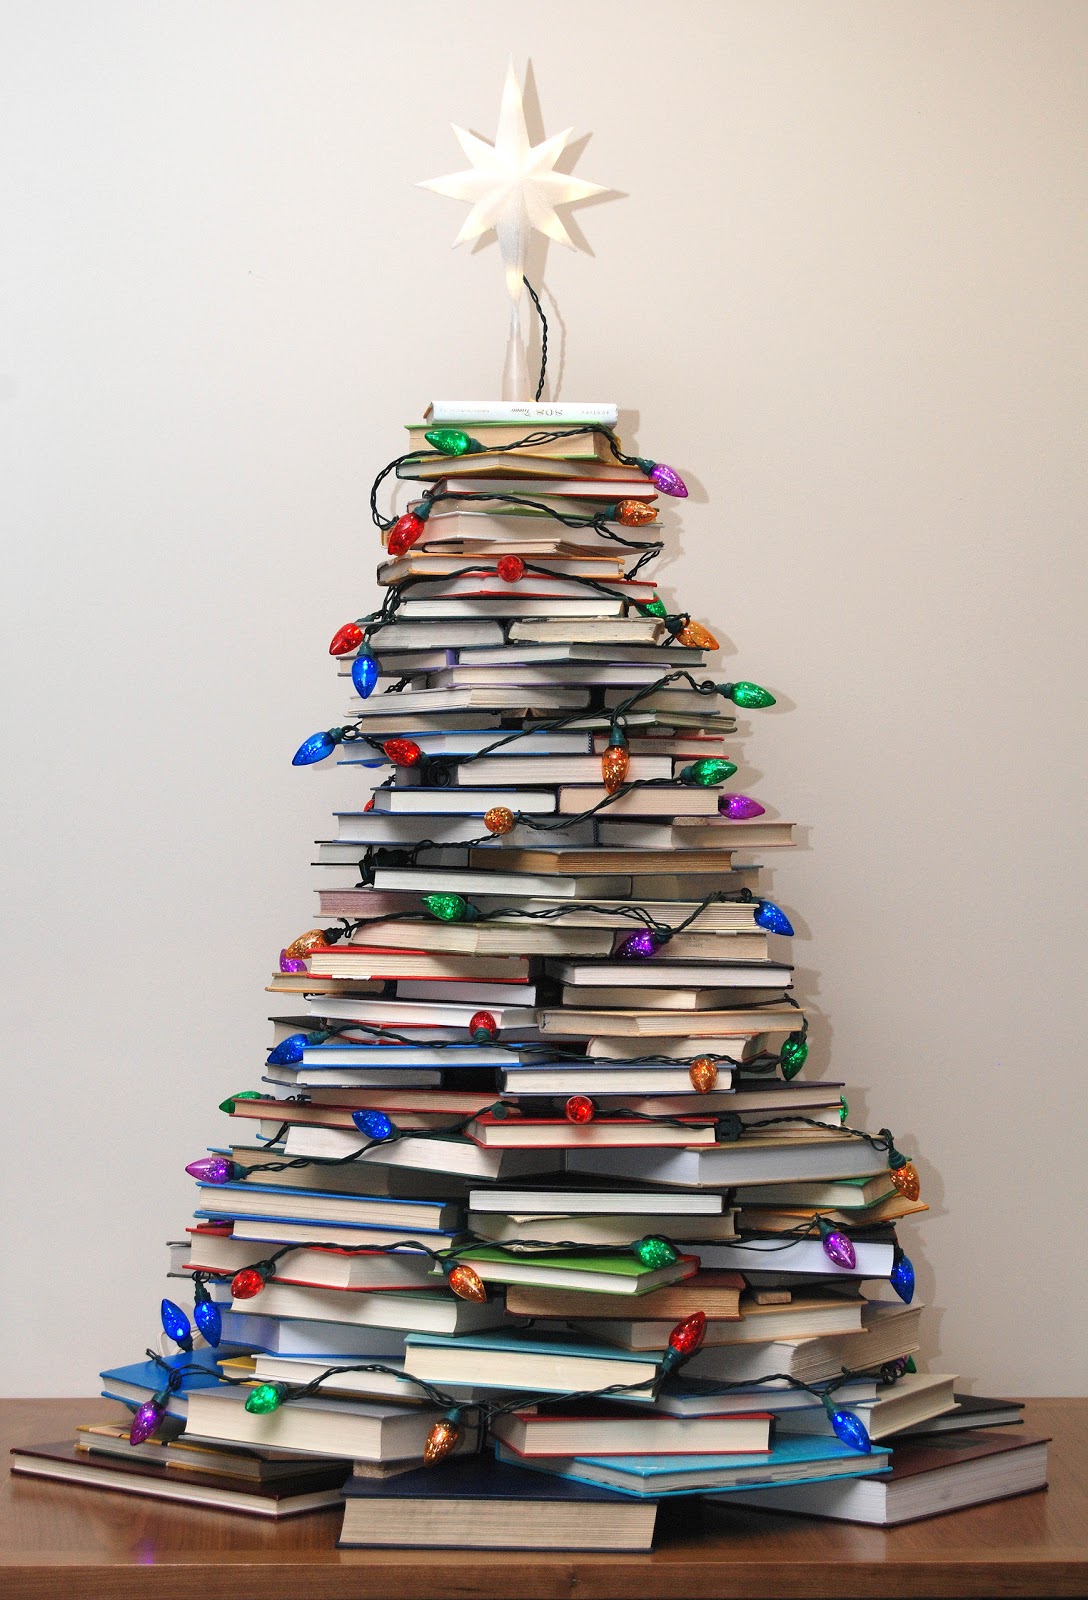
- Books (of course). I used about 80.
- 2 packs of Wood shims if your tree is going to be very tall
- 3 strings of large bulb LED lights
- Tree topper (either purchased or improvised as below)
Gather your own books or find a used book store at a library. The library where I work has many books for as little as 25 cents. The titles don't really matter, you're looking for different sizes and widths. I also removed the book jackets from every book I used. I like the mix of solid colors on the covers, and the book jackets would be too busy. I also turned the books so that the pages faces out. I like the neutral look and then you're not distracted by the titles. The large tree above used about 80 books, but you can use any amount you have.
Begin by laying out the books in a flat circle. I started with a 48" round area and placed the books like the spokes of a wheel. Don't forget to put some books in the middle, as this will be the supporting base. Don't worry if they are not perfectly level. The weight of the books keeps it rather sturdy. I also used
wood shims from the hardware store (about 2 packages) to help keep the layers somewhat level.
Keep stacking and turning the books so that you get nice layered, mixed depth edges. Start each layer in the middle. I did put the heavier and larger books at the bottom, however you will need some thinner and smaller books to help even out your layers and provide support on the edges. The closer you can keep the books to each other in your layers, the sturdier the book tree will be.
You'll get to the point where
three books will be all you can fit on a layer. Line two up vertically and place another across the bottom horizontally to make a rectangle as best you can. You can use this method for many, many layers by just turning the edges of your three books to a rectangle shape a bit each time. Then you'll get down to
two books, and make a square with them. Keep layering sets of two books and turning each "square" slightly for texture and interest... and balance!
I then used
single books and made many layers, again turning the books so that various "points" of the books were showing. Before adding the lights, give your tree the once over and add wood shims wherever you see gaps in the book layers. These really helped my tree become a bit more sturdy.
I added the large C9 lights last, winding them rather rightly around the books all the way to the top. I used 3 stands. They're pretty cool as they are filled with tinsel. They are also LED lights and don't heat up. Not a bad idea when they're wrapped around old books in a building filled with books.
My tree topper on the top tree was that very inexpensive and
cute retro star I saw in the store and blogged about the other day. I simply glued the removable base to the top book with Gorilla Glue, let it dry for 24 hours, and pushed the star into the base. It's not so pretty from this angle, but you don't see that part as the tree is up on a counter and you're looking up at it from below. I just included this next shot so you could see my glue work! Also, see how the books are turned a bit and I layered various the various colors.
I made a second tree for the Friends' bookstore and improvised with smaller lights and a small book on it's side for the topper. This one went up really fast and would be very easy to do at home. I didn't use any adhesive to hold the books together, which is nice because after the holidays, the books can go right back on your shelf undamaged.
We have a used book store operated by the Friends of the Library, an amazing group of volunteers that generously donate their time and funds raised to the library. They receive boxes and boxes of books as donations which they then sell in their shop. The group supplied me with all the books for these projects.
Have fun making your book tree... Season's Readings to You and Yours!

Linking to:
Common Ground
My Romantic Home
http://tatertotsandjello.com